Its been some time from my last posts but here is an update.
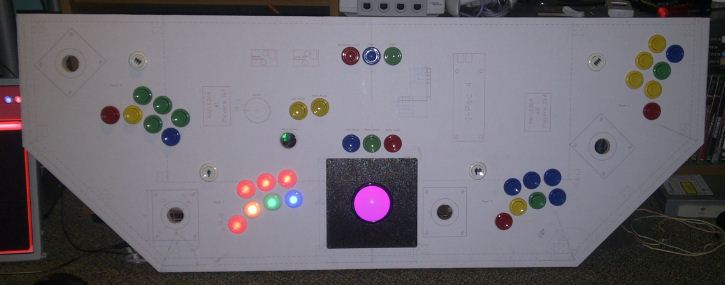
I was able to complete my panel along with all the RGB leds.
I'm just waiting for my UHDI controller to come in to replace the controller's that came with my spinner and track ball due to not being able to program them they way I want, with the new controller I can pick whats what and it will give me a mouse 1 and mouse 2 button config vs just a 1 mouse.
I will try and post the rest of what I did and update the gaps but so busy with other stuff.
Tuesday, July 2, 2013


Project Arcade 10 of 0.0
Lots of head way was made.
I got the base cut and put togeather and ran across a few issues.
1st some of the boards didnt fit 100% but we where able to get them knock in to place
2nd the main board in the front bent in over night while the glue dried and we didnt notice when we marked and drilled the holes for the screws :| so stuff is off but no biggy no one will notice but then ill allways know :|

Every thing in place and letting the glue dry over night to get a nice good grip.
From this i should have made a support beam for the middle to keep stuff from bowing but oh well.
Had issues with removing the template off due to it being on for so long and ended having to use laquer thinner to help peel it off the sticker but once i got that off i went ahead and stained a scrap peace of wood to see how it will turn out while that dryed i started to sand and get every this ready for the staining.
 I had a bit of an issue with some of the pin markings bleeding through so I had to pick a darker stain to cover up the marks. :|

I got the base cut and put togeather and ran across a few issues.
1st some of the boards didnt fit 100% but we where able to get them knock in to place
2nd the main board in the front bent in over night while the glue dried and we didnt notice when we marked and drilled the holes for the screws :| so stuff is off but no biggy no one will notice but then ill allways know :|

Every thing in place and letting the glue dry over night to get a nice good grip.
From this i should have made a support beam for the middle to keep stuff from bowing but oh well.
Had issues with removing the template off due to it being on for so long and ended having to use laquer thinner to help peel it off the sticker but once i got that off i went ahead and stained a scrap peace of wood to see how it will turn out while that dryed i started to sand and get every this ready for the staining.


Monday, February 27, 2012
Project Arcade 9 of o.0
Parts and current progress.
Some of this was done some time back but I'm trying to catch up on my blogging but hard to when life keeps you so busy oh well lets get down to it.
Made some progress on the panel, i went ahead and got all the holes drilled out and sanded to smooth them out and got joy sticks mounting holes drilled out and the hidden mounts inserted.
 I like this mounting kit for the joysticks way nicer then having the ugly bolts on the top, with this the bolts are on the bottom so you never see them.
With all most every thing done i went a head and mounted what buttons i have just as a test fit and to test the RGB buttons and track ball to see if i even want to spend the money on the buttons and to my surprise they look really nice and i want to order more buttons but http://groovygamegear.com/ has been sold out of them for some time so that shows there very popular or have i notice people have been buying them and selling then on eBay fore more then they cost. >.> hate people who do that ANY WHO here is a pix of it.
 So far i think its looking good now to get the other 21 RGB buttons and ill be all set :D
Finally got my spinner in and the hole sized and cut for it and its bigger then i thought but that's no big deal its nice to see my plans coning together.
 it mounts in the same size hole as the buttons then there is a little ribbon cable that goes from it to the controller and bada bing bada boom, I did notice that its the same controller as my track ball just with the ribbon connector so i wonder if i can use it for my trackball to so i wont burn up all my usb ports on the little things.
Ill post more when i get time :|
Some of this was done some time back but I'm trying to catch up on my blogging but hard to when life keeps you so busy oh well lets get down to it.
Made some progress on the panel, i went ahead and got all the holes drilled out and sanded to smooth them out and got joy sticks mounting holes drilled out and the hidden mounts inserted.

With all most every thing done i went a head and mounted what buttons i have just as a test fit and to test the RGB buttons and track ball to see if i even want to spend the money on the buttons and to my surprise they look really nice and i want to order more buttons but http://groovygamegear.com/ has been sold out of them for some time so that shows there very popular or have i notice people have been buying them and selling then on eBay fore more then they cost. >.> hate people who do that ANY WHO here is a pix of it.
Finally got my spinner in and the hole sized and cut for it and its bigger then i thought but that's no big deal its nice to see my plans coning together.

Ill post more when i get time :|
Sunday, February 19, 2012
Alive
Yes i am still alive been very very very busy with work but thats the IT world for ya.
Stay Tuned i have so much to update on my arcade cabnet.
We have been trying to get a new car so i cont have to worry so much about my wife driveing her car so afrade of being out of town and her to break down and be stranded in the middle of no where. :|
Work wise we been doing upgrades to all of our stores and getting them on to a real network so its been about 4 weeks of almost none stop work but is a odd way i enjoy keeping busy.
I cant wait till Tuesday the new OS update for my Blackberry Playbook comes out and i soooo cant wait finally total e-mail support and i wont need to bridge my bberry to it any more to get e-mail but then they updated bridge like crazy so this is going to be so awesome.
Stay Tuned i have so much to update on my arcade cabnet.
We have been trying to get a new car so i cont have to worry so much about my wife driveing her car so afrade of being out of town and her to break down and be stranded in the middle of no where. :|
Work wise we been doing upgrades to all of our stores and getting them on to a real network so its been about 4 weeks of almost none stop work but is a odd way i enjoy keeping busy.
I cant wait till Tuesday the new OS update for my Blackberry Playbook comes out and i soooo cant wait finally total e-mail support and i wont need to bridge my bberry to it any more to get e-mail but then they updated bridge like crazy so this is going to be so awesome.
Sunday, January 29, 2012
Project Arcade 8 of 0.o
Its been a very busy week helping test software at work and helping get a new server up and running along with every thing else.
Spent some time finishing up the area for the trackball and its mounting plate.


 Now that i got the plate fitted time to start on the holes but 1st need to find the correct bit.
More later on. Sorry im so slow at this.
Spent some time finishing up the area for the trackball and its mounting plate.


More later on. Sorry im so slow at this.
Wednesday, January 11, 2012
Project Arcade 7 of ummmm
We started the cutting and about time to i say but oh well like i said before thing came up.
My father and I started to cut out the main shape of the controller panel, i know some people measure it all out by hand but for me i rather do it all in cad and plot it out so i can just cut on the dotted lines lol.
here is some pix (wife took them for me)


Now that we got the shape done and every thing is looking good we started to work on the trach ball hole.


Now thats out of the way it was time to start the buttons. :D
Monday, January 9, 2012
Project Arcade 6 of errrrrrrrr
Construction time :D
On Saturday my father and I went by Lows to pick up the wood the controller panel for the arcade cabinet, I decided to get 3/4th thick Particle board instead of MDF due to the weight and the MDF splits and tears to easy so particle board for the win even though it cost more it will be worth it in the end because i can go back and stain it with a nice finish instead of having to paint it all black.


On Saturday my father and I went by Lows to pick up the wood the controller panel for the arcade cabinet, I decided to get 3/4th thick Particle board instead of MDF due to the weight and the MDF splits and tears to easy so particle board for the win even though it cost more it will be worth it in the end because i can go back and stain it with a nice finish instead of having to paint it all black.
sadly when i had them do the cuts for me i ask them to me a 1'6" section and decided to go ahead and cut a 1'7" section to just in case some thing happened and well I'm glad i did, the 1st cut they did for me the goof ball did a 1'5"5/8th cut so he ruined that part for me and the 1'7" section isn't square but i was still able to use it so if you can its best to cut it your self. i so need a table saw.
after trimming my plans we spraid the back of the plans with a spray glue and let it sit for 10 min before putting it on the wood so it will be more like a peal and stick sticker and will be easy to remove, a nice little trick i say.


Monday, January 2, 2012
Project Arcade 5 of ?!?!?!?!?!!?!?!?!?!!?!?!?!?!??!?!?!?
finally back, too much going on in December.
well i made some more head way on the arcade got the control panel plans finalized and plotted so i can start cutting (like i said delays) and the main body is about 80% complete but once i get the panel built it can speed up on the body planning so i know that all my measurements will work plus MDF cost about $30 for a 8x4 sheet and i need 4 so far its adding up fast.
Got my RGB buttons wired up and configured and wow its going to look awesome when i have all the players done but like i have said before I'm just doing player 1 for a test.
 still need to do some tweaking but so far it every thing is ready, I'm having to match all the buttons and colors to the game by hand but instead of doing all of them ill figure out what games get played the most and add them to the list and do all my backups of my configs so if some thing happens i can restore data.
but more later on its bed time and a busy work day.
well i made some more head way on the arcade got the control panel plans finalized and plotted so i can start cutting (like i said delays) and the main body is about 80% complete but once i get the panel built it can speed up on the body planning so i know that all my measurements will work plus MDF cost about $30 for a 8x4 sheet and i need 4 so far its adding up fast.
Got my RGB buttons wired up and configured and wow its going to look awesome when i have all the players done but like i have said before I'm just doing player 1 for a test.

but more later on its bed time and a busy work day.
Thursday, November 24, 2011
Tuesday, November 22, 2011
Project Arcade 4 of .........................
Short post tonight because its late.
I got my RGB buttons in today all 7 of them so i set up a quick test for them to test the lighting and the button color matching.
See short vid
More later on. must sleep.
Sunday, November 20, 2011
Project Arcade Part 3 of ?!?!?!?!?!?!?!?!?!?!?!?!?!?!?!?!?!?!?!?!?!?
/me wonders if any one is reading this place LOL
6. Mesure twice cut once and dont.........slice...your umm digits off......../sigh off to the hospital.
What to make it out of that is the BIG question??????????????????????????
This is a very very hard question for me because i dont know how i want to do this. because i dont want it to heavy where it takes 20 people to move or so light it will just fall over and squish ya.
number 7 will be later on but on a side note im having to redesign part of my cabinet to many hard anges to manage and i like to keep it simple even though the angles make it look cool but its for the best i say, I got all my plans for the panel plotted out so maybe after the break i can cut stuff out and get out of the way and let the nephews that are coming over to stay with us try it out for me cause i know if they think its cool i will be good to go that is if i dont drive my dad up the wall with the little project lol.
Tomorrow my LED RGB buttons come in wooohoooo now i can finish testing and make sure what i want will work before spend the money on it but then after testing i have to give them to the wife so she can wrap them because it is my xmas prez. i know where odd lol.
6. Mesure twice cut once and dont.........slice...your umm digits off......../sigh off to the hospital.
What to make it out of that is the BIG question??????????????????????????
This is a very very hard question for me because i dont know how i want to do this. because i dont want it to heavy where it takes 20 people to move or so light it will just fall over and squish ya.
number 7 will be later on but on a side note im having to redesign part of my cabinet to many hard anges to manage and i like to keep it simple even though the angles make it look cool but its for the best i say, I got all my plans for the panel plotted out so maybe after the break i can cut stuff out and get out of the way and let the nephews that are coming over to stay with us try it out for me cause i know if they think its cool i will be good to go that is if i dont drive my dad up the wall with the little project lol.
Tomorrow my LED RGB buttons come in wooohoooo now i can finish testing and make sure what i want will work before spend the money on it but then after testing i have to give them to the wife so she can wrap them because it is my xmas prez. i know where odd lol.
Sunday, November 13, 2011
Project Arcade Part 2 of ???????????????????????
Well my arcade project is getting put in to a holding pattern until i get my plans straiten out and save up some cash who knew this was going to add up so fast :| but on the good side thanks to my wife she let me order 7 of my RGB LED Buttons for just player 1, Why just player one WELLLLLLLL at $45 for 7 and there is 4 total players and it adds up so i just want to test one side before i spend a lot and it not works or looks bad then im just out $45 then close to $200 and be left with buttons that i cant use well i can use them but not in the way i want to any who i digress what they will do for me is i can set the buttons to light up in any color so for like neogeo games it will only light up the buttons for that game and the color of the button for that game hard to explain so once they come in i will take pix of them better then me trying to explain lol.
On to the other parts. Now i have had the parts for a while now but with my blog i can explain my progress of my project :D
1. The Heart of Project Arcade.

This is a "IPac4 (4 player version)" why do i need this well let me tell you why, MAME uses key board commands for the button presses unlike a real arcade system where its electrical so left ctrl is player 1 button 1, left alt player 1 button 2 and so on.
So with the IPac it takes the electrical commands from the buttons and converts it to the keyboard commands and yes i can program it to be any command for any button, some people do keyboard hacks where they take apart a keyboard and pull the controller out and hot wire it. Yes that's a good cheep way to do it if cash is tight but to me i rather go the easy way and buy the IPac.
2. Buttons Buttons Buttons oh and some joy sticks.
The fun part ordering your buttons and joy sticks and this is where you can get creative now some people stick to 1 color or 2 colors but me HA i want COLOR MAHAHAAHA but for phase 1 i ordered Red, Green , Blue, and Yellow and later on ill get other colors but want to get the basic stuff out of the way.
 6 of each except for Red but there is a reason behind that and that involves the RGB buttons.
3. To Mouse or Not To Mouse that is the Question
To mouse is the question some i have seen some that have a track ball and read some that say don't bother well i went all out and got one and not just a normal one but an RGB one yes i love the lights.
Here is a few pix of it


The track ball "ball" is 3" in diameter and the model i got has RGB LEDs in the bottom to allow me to change the color to any color i want and with the software LED Blinky i can configure the ball to be different colors when X game is loaded or off when the game doesn't use the trackball.
4. LET THERE BE LIGHT. RGB LEDs I say :P
Now how am i doing all this color mixing well easy.... all by hand yep and i use a flux compositor and some duct tape and bailing wire to.................. just kidding i use a PacLED64 controler.
 What this baby does is allows me to turn on and off certin channles thus turning on\off the led that is on that channle, iv also pongered if i can use it to control a relay to to have say a fan turn on but ill stick to leds lol.
Up to 64 leds can be connected to it at the same time and all can be on with no issues or 20 RGB leds due to needing 3 channles per led but in my current plan i will need 2 controlers but that will be way later on.
5. Yes Mom i had to take it apart to see how it works. ( The Screen)
As a kid i allways took stuff apart and wasent allowed to have screwdriver in my hand but that didnt stop me though :P on that note i been trying to descide on what kind of screen i needed, many people go the old school way and put in a CRT screen (the old big glass screens) but im going to do LCD for a few reasions.
1st - Size a CRT is so big i need to have enough room in the back.
2nd - Weight some CRTs can get really heavy and the bigger you go the heavyer they get.
3rd - Heat a CRT produses a lot of heat thus i will need to have more fans to vent the heat out.
4th - Death a CRT can be very dangerious and if you not carefull it can kill you in a heart beat.
So yeah i think ill stick to an LCD screen.
 This was a View Sonic monitor i had laying around nice little 19" so i think it will do fine for now till i find a bigger one later on.
Well i think thats it for today sick of typing lol
On to the other parts. Now i have had the parts for a while now but with my blog i can explain my progress of my project :D
1. The Heart of Project Arcade.

This is a "IPac4 (4 player version)" why do i need this well let me tell you why, MAME uses key board commands for the button presses unlike a real arcade system where its electrical so left ctrl is player 1 button 1, left alt player 1 button 2 and so on.
So with the IPac it takes the electrical commands from the buttons and converts it to the keyboard commands and yes i can program it to be any command for any button, some people do keyboard hacks where they take apart a keyboard and pull the controller out and hot wire it. Yes that's a good cheep way to do it if cash is tight but to me i rather go the easy way and buy the IPac.
2. Buttons Buttons Buttons oh and some joy sticks.
The fun part ordering your buttons and joy sticks and this is where you can get creative now some people stick to 1 color or 2 colors but me HA i want COLOR MAHAHAAHA but for phase 1 i ordered Red, Green , Blue, and Yellow and later on ill get other colors but want to get the basic stuff out of the way.

3. To Mouse or Not To Mouse that is the Question
To mouse is the question some i have seen some that have a track ball and read some that say don't bother well i went all out and got one and not just a normal one but an RGB one yes i love the lights.
Here is a few pix of it
This is the best track ball i have ever found.


The track ball "ball" is 3" in diameter and the model i got has RGB LEDs in the bottom to allow me to change the color to any color i want and with the software LED Blinky i can configure the ball to be different colors when X game is loaded or off when the game doesn't use the trackball.
4. LET THERE BE LIGHT. RGB LEDs I say :P
Now how am i doing all this color mixing well easy.... all by hand yep and i use a flux compositor and some duct tape and bailing wire to.................. just kidding i use a PacLED64 controler.

Up to 64 leds can be connected to it at the same time and all can be on with no issues or 20 RGB leds due to needing 3 channles per led but in my current plan i will need 2 controlers but that will be way later on.
5. Yes Mom i had to take it apart to see how it works. ( The Screen)
As a kid i allways took stuff apart and wasent allowed to have screwdriver in my hand but that didnt stop me though :P on that note i been trying to descide on what kind of screen i needed, many people go the old school way and put in a CRT screen (the old big glass screens) but im going to do LCD for a few reasions.
1st - Size a CRT is so big i need to have enough room in the back.
2nd - Weight some CRTs can get really heavy and the bigger you go the heavyer they get.
3rd - Heat a CRT produses a lot of heat thus i will need to have more fans to vent the heat out.
4th - Death a CRT can be very dangerious and if you not carefull it can kill you in a heart beat.
So yeah i think ill stick to an LCD screen.

Well i think thats it for today sick of typing lol
Monday, November 7, 2011
Project Arcade Part 1 of ?
Well im finally making headway on my Arcade project, for thoes who dont know im designing and building a arcade cabnet that runs MAME with GameEX frontend in a nut shell thats 4k+ arcade games.
The other night my dad help me figure out the LED controller so i can do testing befor i spend alot on RGB buttons and it not work so yeah i rather spend $10 than $100+ but so far i have the control panel layout done and printed out so just need to glue down the plans and start cutting it out so i can get sizing right and play errrr test it out. lol
The cabnet design is coming along quite well keep getting stuck on the little details and picky about this and that, just want it to be perfect but i know perfect is imposble.
The other night my dad help me figure out the LED controller so i can do testing befor i spend alot on RGB buttons and it not work so yeah i rather spend $10 than $100+ but so far i have the control panel layout done and printed out so just need to glue down the plans and start cutting it out so i can get sizing right and play errrr test it out. lol
The cabnet design is coming along quite well keep getting stuck on the little details and picky about this and that, just want it to be perfect but i know perfect is imposble.
Wednesday, November 2, 2011
ZZZzzz...
Dont you hate it when you have a full belly and its getting nice and cold out side makes me wanna curl up and pass out......
I love this time of the year it getting nice and cold no more waking up in the middle of the night swetting to death you get that perfect warm spot and can just sleep allllllllllllllll day.
Today is one of them slow days of blah.
I love this time of the year it getting nice and cold no more waking up in the middle of the night swetting to death you get that perfect warm spot and can just sleep allllllllllllllll day.
Today is one of them slow days of blah.
What a night
Well yesterday was a fun day :/
I was talking to my wife and she told me theres a beeping in the house, well i had her check the water heater because we have an alarm in the pan so if it leaks we know well that wasnt it she told me its coming from the office ok no big deal one on my ups's must be dead.
Well got home both servers are down no problem i just reset the ups and they started to boot......5min later still no net ok maybe its taking a bit to fire up.......10min later..... what the heck so dug around got a keyboard hook up and the monitor fired up and (geek time) its giving a warning about a disk fail...... CRAP............ i hate disk failers exp when i lost all my 3D art work but another story anywho i try to get it to ingnore it and boot and it took a good 8min to finally come up and omg its bad slow went a head and shut her down and found what drive was bad......CRAP its my data drive (not this again) *cry* after some digging i remember i set it up as a raid 5 OMG YES!!!!!!!!!!!!!!!!!!!!!!!! (this means i can have 1 drive die and no data lost) so now is the fun part hunting for a drive and for my server the cheepest i have found is 148 ouch. ugh why do i have to be a computer geek our addiction isnt a cheap one.
oh well thus is life.
I was talking to my wife and she told me theres a beeping in the house, well i had her check the water heater because we have an alarm in the pan so if it leaks we know well that wasnt it she told me its coming from the office ok no big deal one on my ups's must be dead.
Well got home both servers are down no problem i just reset the ups and they started to boot......5min later still no net ok maybe its taking a bit to fire up.......10min later..... what the heck so dug around got a keyboard hook up and the monitor fired up and (geek time) its giving a warning about a disk fail...... CRAP............ i hate disk failers exp when i lost all my 3D art work but another story anywho i try to get it to ingnore it and boot and it took a good 8min to finally come up and omg its bad slow went a head and shut her down and found what drive was bad......CRAP its my data drive (not this again) *cry* after some digging i remember i set it up as a raid 5 OMG YES!!!!!!!!!!!!!!!!!!!!!!!! (this means i can have 1 drive die and no data lost) so now is the fun part hunting for a drive and for my server the cheepest i have found is 148 ouch. ugh why do i have to be a computer geek our addiction isnt a cheap one.
oh well thus is life.
Subscribe to:
Posts (Atom)